
How to format a hard drive on a Mac
Disk Utility, as its name infers, is your go-to answer for pretty much any drive-related undertakings or issues (shy of cataclysmic physical disappointment). It's a one-stop shop that empowers you to check, repair, control and go down your hard drives and removable circles like SD cards or USB streak drives.
You'll discover Disk Utility in the Utilities organizer inside your applications envelope, yet in the event that your Mac won't start up effectively you can likewise get to it by means of the inherent recuperation choices – hold down Command+R as your Mac begins up to begin in Recovery mode, and you can dispatch Disk Utility from the principle menu that shows up.
1. Eradicate and parcel
Circle Utility empowers you to arrange your capacity by deleting plates, parceling them and setting up RAID exhibits. To eradicate an individual plate or segment, select it in the left-hand sheet and change to the Erase tab.
Give the volume a simple to-discover name, similar to 'Information', and pick an organization. On the off chance that the drive is being utilized solely with Macs, at that point the default macOS Extended alternative is ideal; the 'Journaled' choice empowers the drive to be filed so it can be looked effectively, yet in the event that there's nothing on the drive that you need listed, leave the choice unselected.
You can simply empower ordering at a later date utilizing the Enable Journaling catch at the highest point of the Disk Utility window. In case you're arranging an outside drive that you need to connect to a Windows PC, we prescribe picking exFAT.
2. Plate security
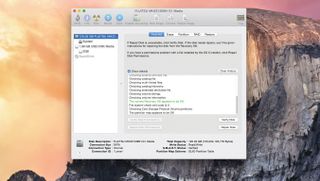
Next, tap on Security Options… to arrange how the drive will be deleted: you can pick a more secure setting if there's information on the drive that you need forever (unrecoverably) evacuated.
At long last, click Erase and pause while the drive is deleted.
3. Segment it!
On the off chance that you select a plate drive as opposed to a segment, you'll likewise observe a Partition tab show up. This empowers you to isolate an expansive limit plate into littler subdivisions, which at that point carry on as though they were separate drives.
Like arranging, parceling wipes every single existing datum on your plate, so is best utilized when setting up another hard drive out of the blue.
4. Circle pictures
Circle pictures are precise of a chosen plate's substance, held in a solitary document. They can be convenient for going down whole parcels or removable plates like USB streak drives.
To move down a current plate, select it in the left-hand sheet and tap the New Image catch. Select an area and filename for your picture; if going down a circle parcel or whole plate, pick an alternate circle to spare the picture to.
Ensure there's sufficient room on your objective drive, at that point click Save and be set up to pause while the picture is made (contingent upon the measure of the reinforcement). When it's set, it'll show up in the left-hand sheet underneath your drives for simple access. Select it and you can check it to guarantee it's not degenerate.
No comments